How to fix Self-Referrals


How to Fix Self-Referrals in Google Analytics

Traffic to your website that originates from a link on another website is called Referral Traffic. Sometimes your own website will report in Google Analytics as a referrer of traffic. This happens when there is a problem with your Google Analytics implementation, as your own website should not be a referrer to itself!

KEY POINTS:
The main purpose of highlighting this problem is to help you get the most out of your analytics by having the best and most accurate data. When your own website is counted as a referrer it takes credit for traffic, site engagement, page-views, site-searches and --most importantly-- conversions. This in turn makes it harder for you to see what marketing and engagement strategies are working for you. 


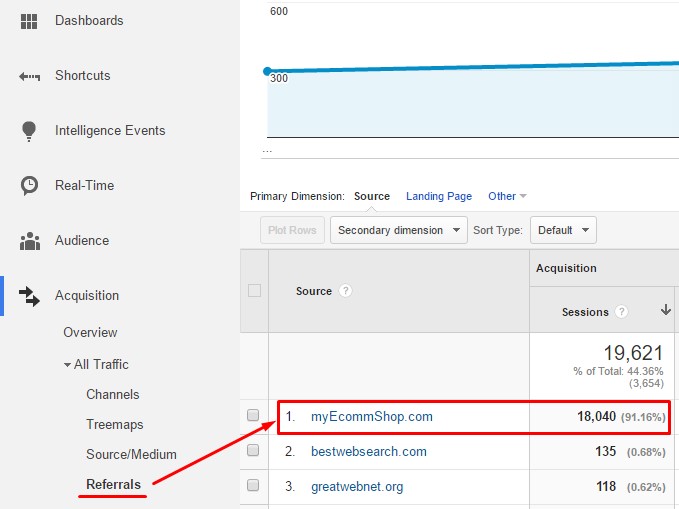
In the example below we show our Clickvoyant test site www.myEcommShop.com as taking credit for over 90% of referral traffic. This is often due to a critical page missing Google Analytics tracking. Imagine a visitor navigates through your site, clicks through content, visits a non-tagged page, then clicks a navigational/product link which takes them to another page that is being tracked. YOU'VE GOT A DATA ERROR! This user will look like they came to the site, left and then came back. When they "come back" they are reported as being refereed by your own website and that next page now reports as being the first page of a new visit. Think of pages missing tracking as a little black holes: As visitors hit those pages, the data path breaks and starts again.


What causes Self-Referrals in Google Analytics?
  • Misstagged Web Pages: Your website might have Google Analytics tracking code implemented but for some reason there is a page or a portion of your site where that Google Analytics tracking code is not firing or working correctly. This can be caused by javascript errors or conflicting code on your site that can interfere with your Google Analytics tracking code.  
  • Missing Google Analytics Tracking Code: A page on your website is missing the Google Analytics tracking code and it is part of the visitor journey or on-site click-path. When this happens, the page with no tracking code will report in Google Analytics as the page that is sending traffic to your website. 
  • Sub-Domain Tracking: When you have a sub-domain for your website like blog.myEcommShop.com interlinks between the sub-domain and the top-level domain traffic between the two sections of your site could also potentially record as self-referrals.
  • 3rd Party Website Plugins: When you use 3rd party plug-ins on your site such as booking engines, calendars, forms, pre-sales, etc., and your website visitor is taken off of your site to the 3rd party service, and then returns back onto your site, visitors might look like they just entered your site on the next page following the plugin in the visitor journey.
  • Payment Gateways & Shopping Carts: It is also quite common to have a shopping cart or 3rd party payment gateway live on a sub-domain of your site and report as a referrer when a visitor passes through your shopping cart or checkout. Again this would report as your site or sub-domain of your site being the referrer and taking credit for the traffic.
How to fix Self-Referrals:
  • Mistagged or Missing Tracking Code: The simplest solution is finding the page on your site that does not have Google Analytics tracking code. You can find this page by looking at the Referrals report in Google Analytics, then selecting a secondary metric for Landing Page. The top landing page for Referral Traffic indicated as your own website is the next page clicked after the non-tagged page. Identify all the pages that link to that top entry page and check all of them for Google Analytics tagging. In addition, installing Google Tag Assistant on Chrome can help you identify issues with tracking on any page. 

  • Sub-Domains Tracking: If the issue is caused by traffic from your own sub-domain please follow the advanced Google Analytics Sub-Domain Tracking tutorial from Google Developers Console.
  • 3rd Party Plugins & Payment Gateways: Google Analytics allows you to exclude certain referrers. The most common use for this is to prevent third-party shopping carts from starting new sessions. When the third-party shopping cart is in the exclusion list, a user will no longer trigger a new session, and the payment system won't be counted as a referral source.
Why Self-Referrals Matter:
  • Attribution: When the wrong referrer is given credit for starting the visitor session, it will overwrite or supersede the correct traffic source. The way Google Analytics gives credit to a visitor session source is by the last domain the visitor was on prior to entering your site. Let's assume that source was a Paid Traffic source like PPC AdWords or an Affiliate site, then they visit your site, navigate to a few pages and then click onto a untracked page and continue to checkout. Your own website will take credit as the referring source and not the appropriate paid traffic source. This makes it much harder for you to identify your effective campaigns.
  • Conversion Rate: This is the most important metric for any website as it is the ultimate goal of having a website. Therefore any data collection imperfection that negatively impacts this metrics needs to be fix and properly configured. Each traffic source needs to report it's own conversion rate correctly rather than having some of that traffic siphoned by your own website reporting as a traffic source. Self-Referrals can also double count sessions, which effectively lowers your conversion rates. 
  • Ad Spend & ROI: When you pay for traffic, there always needs to be a return on investment. Self referrals lead to breaks in attribution, making it very difficult to accurately calculate ROI and better allocate spend.

Need help setting this up? We'll walk you through next steps for setting up your eCommerce analytics.


    How to create thank you page confirmation tracking


    Create an eCommerce Tracking Pixel for your Confirmation  Page using Google Tag Manager Account

    To follow these instructions, you will need to know your confirmation page URL to create the tracking code. The sample used is "example.com/thank-you.html."

    STEP 1: Create a new tag in Google Tag Manager.
    Log in to Google Tag Manager and click on the appropriate account, as with the other examples in this blog we are using "My eCommerce Business."

    Google Tag Manager Account

    Next click on the appropriate Container. For this example, we are using the fictitious "eComm Widget Store."

    eComm Widget Store

    Make sure you are in Container Draft and click on "New."

    Container Draft Google Analytics

    Next select "Tag."

    select Tag eCommerce GA

    You will now have to give the new tag a name. Call it something like “Transaction Sale.”
    Transaction Sale Google Aanalytics

    STEP 2: Select the type of tag. 
    Since this is for the confirmation page and it is for eCommerce Analytics, you will have to start with Google Analytics and then choose Universal Analytics.
    confirmation page for eComm Analytics


    Now enter your Google Analytics Tracking ID which you received when you first set-up analytics. This Tracking ID is needed so that you can connect sales and revenue from your website with the incoming traffic and on-site visitor performance.
    Google Analytics Tracking ID
    Next select the Tag function by selecting the “Track Type.” In this case it is for a transaction or order.
    Tag performance - Track Type


    STEP 3: Set where and how the new tag "fires."
    You will now have to configure when the tag fires. Please select “Firing Rules.”

    Firing Rules Google Analytics

    You will have to create a new rule for when the tag needs to fire. Please click on the radio check-mark for “Create new rule.”
    Google Analytics Create new rule

    Now name the rule something that is descriptive of the firing behavior of the tag. We will call this rule “Order Confirmation Page.”

    name the rule in Google Analytics

    Next, you will have to write a rule for when the tag needs to fire. Since this is for the confirmation page, select the URL from the drop down that contains only the root URI  for the "contains" parameter logic. Basically, the URL for the the page in your final step in the buying process. Check with your IT or Developer to find out what the confirmation page is called.

    For this example we will assume the confirmation page contains the URI "thank-you.html" (this is only an assumption for explanation purposes ONLY, you will need to check with your IT or Developer for that actual page root URI. A note: most times the base URI is followed by query strings. Only use the root URI for the "contains" logic).

    URI thank-you.html

    You now have the tag named, the tag type, the tracking ID for the Google Analytics property, the track type and when it should fire. You are almost there. You just need to click “Save” if everything is in order.

    Once you select “Save” you will be able to see all of the tags you have created. At this point there should only be two tags: Google Analytics (for site wide traffic) and the Transaction Sale tag we just created for tracking confirmation page and sales or orders. 

    You are ready to create the instance of the two tags within the container. Please click the “Create Version” button.
    Transaction Sale tag

    STEP 4: Publish your new Tags!
    Click on “Publish.”
    Scnt5%20-%20o.png

    Once you click on “Publish” you will have to confirm. Click “Publish” again.
    publish tag GA eCommerce
    Congratulations! Your new eCommerce tracking pixel is now live and ready to collect transaction data.


    Need more help setting this up? We'll walk you through next steps for setting up your eCommerce analytics, schedule a free half hour appointment.

    Let us take care of your ecommerce implementation

    How to implement Google Analytics with GTM (Google Tag Manager)


    Google Analytics implementation through a Google Tag Manager container


    Google Analytics is the premier eCommerce analytics tool (free for site traffic of less than < 200K sessions a day). This tool is offered in two versions Classic Google Analytics and Universal Analytics.
    Universal Analytics

    Transition to Universal Analytics

    As of April 2014 all new Google Analytics accounts have to utilize the Universal Analytics tracking code. Classic Google Analytics will be gradually phased out, with all current and future emphasis on the Universal Analytics tracking code. For now Classic Google Analytics will still function, collect data and track your web-traffic. The main difference between the two versions of Google Analytics is the tracking code, the javascript engine they use and increased data configurations through Universal Analytics. Universal Analytics shifts tracking focus to the Visitor, while Classic Google Analytics was Visit oriented. We refer to Google Analytics as GA and will focus on a clean implementation using the latest tracking code version: Universal Analytics.

    Transition to Universal Analytics

    Getting started

    Navigate to www.google.com/analytics/ and select “Access Google Analytics” and sign in with your Gmail Account (use the same account you used to sign up for Google Tag Manager). There are two ways to get the Google Analytics Tracking Code. You will be prompted to either sign up for a new Google Analytics account (if you do not already have an existing GA account) or you will have to create a new Account or Property if you already have a GA account.

    Signing up for a brand new Google Analytics account.

    You will be prompted to sign up and create your Google Analytics account (since there was no GA account associated with your Gmail).


    new Google Analytics account

    Existing Google Analytics Account

    If you already have a GA account you will have to create a new account or property. Sign in to:
    www.google.com/analytics/ and select Admin


    Existing Google Analytics Accoun

    Setting up a New Account

    Once you either sign-up or create a new account, you will be prompted to configure the account by providing website information. You will need to name this account. We are using “My eCommerce Business” as an example. It is best practices to have one account for your business, but you can have multiple Properties. You will then have to name the Property (website) for which you are configuring the tracking code. We are naming this property “eComm Widget Store” - it is best to give it a name that represents the site you plan to deploy on (in case you have several sites or businesses). Lastly, you have to provide the website URL. Make sure the Web Pages button is selected, enter your website address, in this case we are using the fictitious www.myecommwebsite.com domain.
    Sctn3-d.png
    My eCommerce Business

    Google Account vs. Google Property

    A Google Analytics Account is your access point for Analytics while a Google Analytics Property is a subset of data within an account. An account can have more than one property but we recommend one account per business. Imagine you own an eCommerce coffee bean company called “Java the Cup” You have an English website, a Spanish website and a mobile app. Your account would be “Java the Cup” and you would have 3 properties: the English website, the Spanish website and the mobile app.
    Google Account vs. Google Property
    Sctn3-cccc.png

    Select Time & Industry

    Additionally, you will have to select your time zone and the type of Industry in which your website should be classified.
    Select Time & Industry

    Permissions

    Lastly you will need to provide data sharing permissions for your website and tracking code. It is recommended that you share data “With other Google products only” as this will be a requirement for optimizing data integration between Paid Search, SEO, and Google Analytics. The other options are up you regarding the level of data sharing you wish to participate in. Data sharing settings do not make a difference in the level of GA performance.


    data sharing permissions for your website


    “To know where you can find a thing is the chief part of learning.” - Proverb


    Implement Tracking Code

    You are now ready to launch your new GA Universal Analytics tracking code.
    Implement Tracking Code

    Accept Terms

    Upon accepting Google’s Terms & Conditions you will move into the account administrator configuration panel, where you will gain access to your GA Universal Analytics tracking code.
    Google’s Terms & Conditions

    Choose Deployment Type

    There are two ways of deploying GA tracking code on your website. You can deploy through Google Tag Manager or you will have to copy the code in it’s entirety and have IT paste it on every page of your website (note the confirmation page utilizes a specialized configuration of the code that tracks eCommerce performance).


    We recommend implementation using Google Tag Manager for both speed and stability. Make sure to copy the Tracking ID. Log into GTM and navigate to the “Container Draft Overview.” Select “New” to create a tag for GA Universal Analytics.
    Google Tag Manager for both speed and stability


    Name the Tag

    In the New Tag interface name the tag, give it a name that corresponds with the type of tag it is. In this case we are calling it “Google Analytics”. Next select the Tag Type.
    Name the Tag GA eCommerce analytics

    Google Tag Manager comes pre-configured with several types of popular tags. Select “Universal Analytics” (even though there is a choice for Classic GA - that is geared more towards existing Classic GA deployments that are just now adopting GTM).
    Universal Analytics Tag Manger

    Insert ID Code

    At this point you will need to insert the c which you copied from the GA deployment interface.

    GA Universal Analytics Tracking ID code

    Enable Display Advertising Features


    Next select “Enable Display Advertising Features” - this will give you access to a very robust and rich set of demographic data to accompany your web-analytics website traffic and eComm performance data. This data includes viewing Demographics and Interest data for your website visitors, the capability to create advanced segments based on the Demographics and Interest data, and the ability to create Remarketing campaigns for AdWords that are based on website behavior as well as demographics or interest segments. For Track Type select “Page View.”

    Enable Display Advertising Features in GA

    “Life is like riding a bicycle.
    To keep your balance, you must keep moving.”- Albert Einstein


    Additional Configurations

    There are a few more additional configurations. Select “More settings” then the drop-down “Ecommerce Features” and check both “Enable Enhanced Ecommerce Features” as well as “Use data layer” to pass data between your site and Google Analytics through GTM. We will review data layers configuration and set-up, in the Omnichannel section of Volume 2.

    Additional Configurations for eccoomerce

    Firing Rules

    Next you will need to select Firing Rules. GTM allows the site owner to select when and how tags fire or are activated (for example on Product Detail Pages - for remarketing, in the Cart for cart abandon emails, or the Confirmation Page for affiliate marketer commission reporting). GA Universal Analytics needs to fire on every page of the site. Click “+Add”.
    GA Universal Analytics on every page of the site

    This rule is already pre-loaded into GTM. Select “Choose from existing rules” then click on “All pages” this will ensure that analytics will track every page and click on the site, from the start of a session through to the confirmation page.

    confirmation page GA ecommerce


    Finalize

    This concludes the Tag configuration. Click Save to finalize the Universal Analytics tag through GTM.

     Universal Analytics tag through GTM


    Publish

    Now that the Tag has been created it is time to deploy it. The current tag you just built for analytics through GTM is not live yet, hence not collecting data. You need to click on “Publish” to push the tag live.

    push the GA tag live


    Confirm

    You will have to confirm that you are ready to publish the version of the container that has the configured Google Analytics tag. Click “Create Version and Publish”.

    GTM Create Version and Publish


    The Tag is Live

    The tag is now live and ready to collect web-traffic data for your web site. The beauty of GTM is that you can push a tag live without having IT or a Developer push code onto the site, it is all piped through the Google Tag Manager implementation.

    initial GTM tag for Google Analytics

    If you decide to bypass GTM and deploy by pasting the code onto every page of your site, copy the code exactly as generated by Google and insert it into the Global Header, right before the closing </head> tag.

    Please Note!

    Regardless of which method you used to deploy GA Universal Analytics on your website, the eCommerce configuration is not yet completed.
    The confirmation page utilizes its own specific code. The eCommerce code is not included in the standard analytics tracking code, because not all websites conduct eCommerce and because eComm has its own specific nuances and transactional data to capture.


    “The hardest work begins in
    dry dock.” - Sam Wineburg

    Important things to know about Google Analytics:


    • Google Analytics can not track any data before it is configured. The day the tool is configured is when the data will start. This extends to setting up events, goals, or enabling other features.

    • eCommerce integration requires some important additional steps
    •  
    •  

    • Need help setting this up? We'll walk you through next steps for setting up your eCommerce analytics.


    •  
    •  
    •  

    32 Google Analytics Must Have's for Best in Class eCommerce Stores

    Best in Class eCommerce Analytics Data Integration Checklist:

    In today’s business, whether your primary business is eCommerce or not, you have to have a website. You know this, so you’ve gone through all the right steps to make sure your customers can find you online, you have a nice landing page, a call to action, you are posting on social media, and maybe even doing some advertising. Now what?

    If you don’t have analytics set up on your site with best practices, you may be wasting your time and money. How can you improve your business if you don’t know what your customers are doing? Where are they coming from? What are they looking at? What are they not looking at? What should you do about it tomorrow? Analytics is the key to understanding your customers’ past, present and future. 

    Just like when you start a brick-and-mortar store, you want to make sure you cover all of your bases. You check the shelves, you talk to customers, you get feedback from employees. If you have a store, and someone asks an employee where something is, you want them to be able to find it right? The difference is, if you don’t have your site search set up, someone can easily just click out of your store, and unfortunately it is that easy to lose a customer in the digital space. Setting up your store is where we come in. Analytics helps you check your digital shelves. Analytics shows you what you customers want. Analytics helps you decide how to advertise more effectively. Following this roadmap ensures your store will be up and running with the best analytics practices in place. We will be your guide and take you to from beginning to end. 

    Ready?

    1. ОGoogle Tag Manager
    2. ОGoogle Analytics: Universal Analytics
    3. ОEnhanced eCommerce and Confirmation Page Pixels
    4. ОWebmasters - Google (SEO)
    5. ОBing - Webmasters Tools (SEO)
    6. ОGoogle AdWords (Google Search PPC)
    7. ОBing Ads (Yahoo & Bing Search PPC)
    8. ОSite Search Optimization
    9. ОInbound Link Campaign Tracking UTM Tags
    10. ОSocial Media Tracking in Analytics
    11. ОUpload Marketing Costs in Analytics
    12. ОBot-blocking in Analytics
    13. ОVisitor Demographics & Interest Reports in Analytics
    14. ОGoogle Content Experiments (Site Optimization A/B Testing)
    15. ОLink Share URL Shortener Analytics
    16. ОWebsite Likes and Product Page Sharing
    17. ОOn-site Event Tracking in Google Analytics
    18. ОCustom Dimensions in Google Analytics
    19. ОCustom Metrics in Google Analytics
    20. ОConversion Tracking (Confirmation Page or Events)
    21. ОProduct / Cart Abandon Remarketing
    22. ОOn-site Content Grouping in Google Analytics
    23. ОMarketing Channel Settings in Google Analytics
    24. ОConversion Attribution Model in Google Analytics
    25. ОAdvanced data Segmentation in Google Analytics
    26. ОCustom Alerts in Google Analytics
    27. ОTraffic and Site impact Annotations in Google Analytics
    28. ОWebsite Speed Tracking
    29. ОGoogle Real-Time Website Analytics
    30. ОThink with Google (online marketing insights)
    31. ОGoogle Trends (keyword based market research)
    32. ОMobile Website Responsive Design